How to Make a Spirit Whiteboard
The Spirit Whiteboard is a device to help spirits communicate with people. When the Spirit Whiteboard senses electrical disturbances in the air, it moves the pointer. The stronger the disturbance, the faster the pointer moves. Dry erase whiteboard spaces allow for words or pictures to be drawn that can be answers to questions posed by paranormal investigators. There are two power switches, so that you can turn off the motor if you just want to use the device as an EMF detector.
You can purchase everything you need from Amazon. Links are provided below. The items are linked to Amazom strictly for convenience, we do not profit from these links and you might be able to get these items cheaper somewhere else.
What you will need:
24oz plastic coffee container (or any container of sufficient size that has a removable lid)
Scotch Dry Erase Tape, 1.88" x 5 Yards, 1 Roll, White (1905R-DE-WHT)
Arduino Uno or Nano
9 volt battery to arduino power cable
Tools:
3/4" drill bit or Exacto blade
Scissors
Ruler
Wire cutter and stripper
Hole punch
Soldering iron
Heat shrink tubing or electrical tape
Instructions for Making a Spirit Whiteboard
Use a 3/4" drill bit or an exacto blade to make two holes in the side for the power switches. If you dont want to make the holes, you can tuck the power switches inside and pop the top when you want to power on or off.
If you are going to paint it, now is the time. I put painters tape around the top so the red would light up when the LEDs come on.
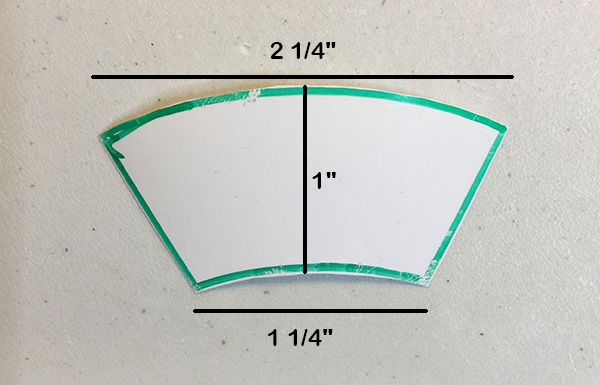
Cut out 5 dry erase tape panels. Use a dry erase marker to draw the panel on the dry erase tape. Cut the shape out. Make five of these.

Use an Exacto blade to cut out a hole in the center of the top for the motor.
Punch a small hole in the top, about 1 1/4" from the edge, for the M2.5 antenna screw.
Use a glue gun to adhere the motor to the inside of the top.
Attach the antenna to the top using a 2.5mm screw and two washers, one on each side. Do not fully tighten yet.
Cut a 8" piece of 22 AWG solid hookup wire. Using wire cutters, expose some bare wire in the middle of the wire as shown.
Wrap the exposed wire around the antenna screw and tighten.
Assemble the Theramin per the instructions. Do not attach the orange antenna wire or the regulator that comes with the kit.
Upload the following code to the Arduino.
// Spirit Whiteboard Version 1.0 by Vortex Hunters 10/9/2020

#include <Servo.h>

Servo Servo1;

int highTime;    //integer for storing high time
int lowTime;     //integer for storing low time
int val = 0;
float period;    // integer for storing period
float freq;      //storing frequency

void setup() {

  pinMode(8,INPUT);  //Set pin as input
  Servo1.attach (3); //Set motor pin

}

void loop()
{
    highTime=pulseIn(8,HIGH);  //read high time
    lowTime=pulseIn(8,LOW);    //read low time
    period = highTime+lowTime; // Period = Ton + Toff
    freq=1000000/period;       //getting frequency with totalTime is in Micro seconds

    if(freq <= 525){

    Servo1.write(90);
    delay(100);

    }
    else {
       val = map(freq, 525, 2500, 89, 0);
       Servo1.write(val);
    }

}
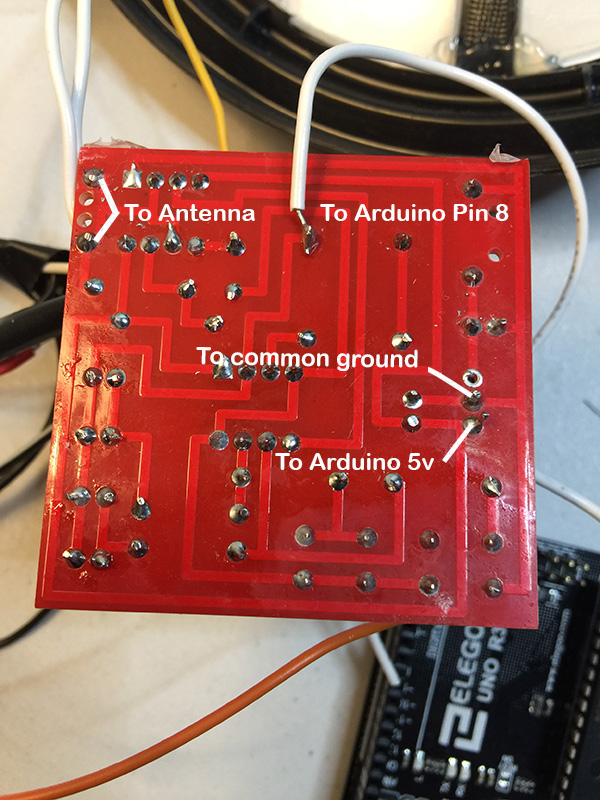
Connect all components as shown below


Test the device to make sure it is working before hot gluing the theramin to the top and the arduino to the side of the base. With Switch 1 on, the LEDs should light up when you put your hand near the antenna. With both switches on, the motor should turn faster the closer you are to the antenna.
Attach the 9v battery and AA battery holder to the bottom with double-faced tape (so they don't move around but can be removed easily.)
Cut an arrow out of cardboard and hot glue it to the top of the motor arm.
Complete! Happy spirit communicating! Please send us video of your results!

If you need help or have any questions please contact me.